Saturday, 14 May 2011

Mock Up Creation - Inchelina; Thu 12th May

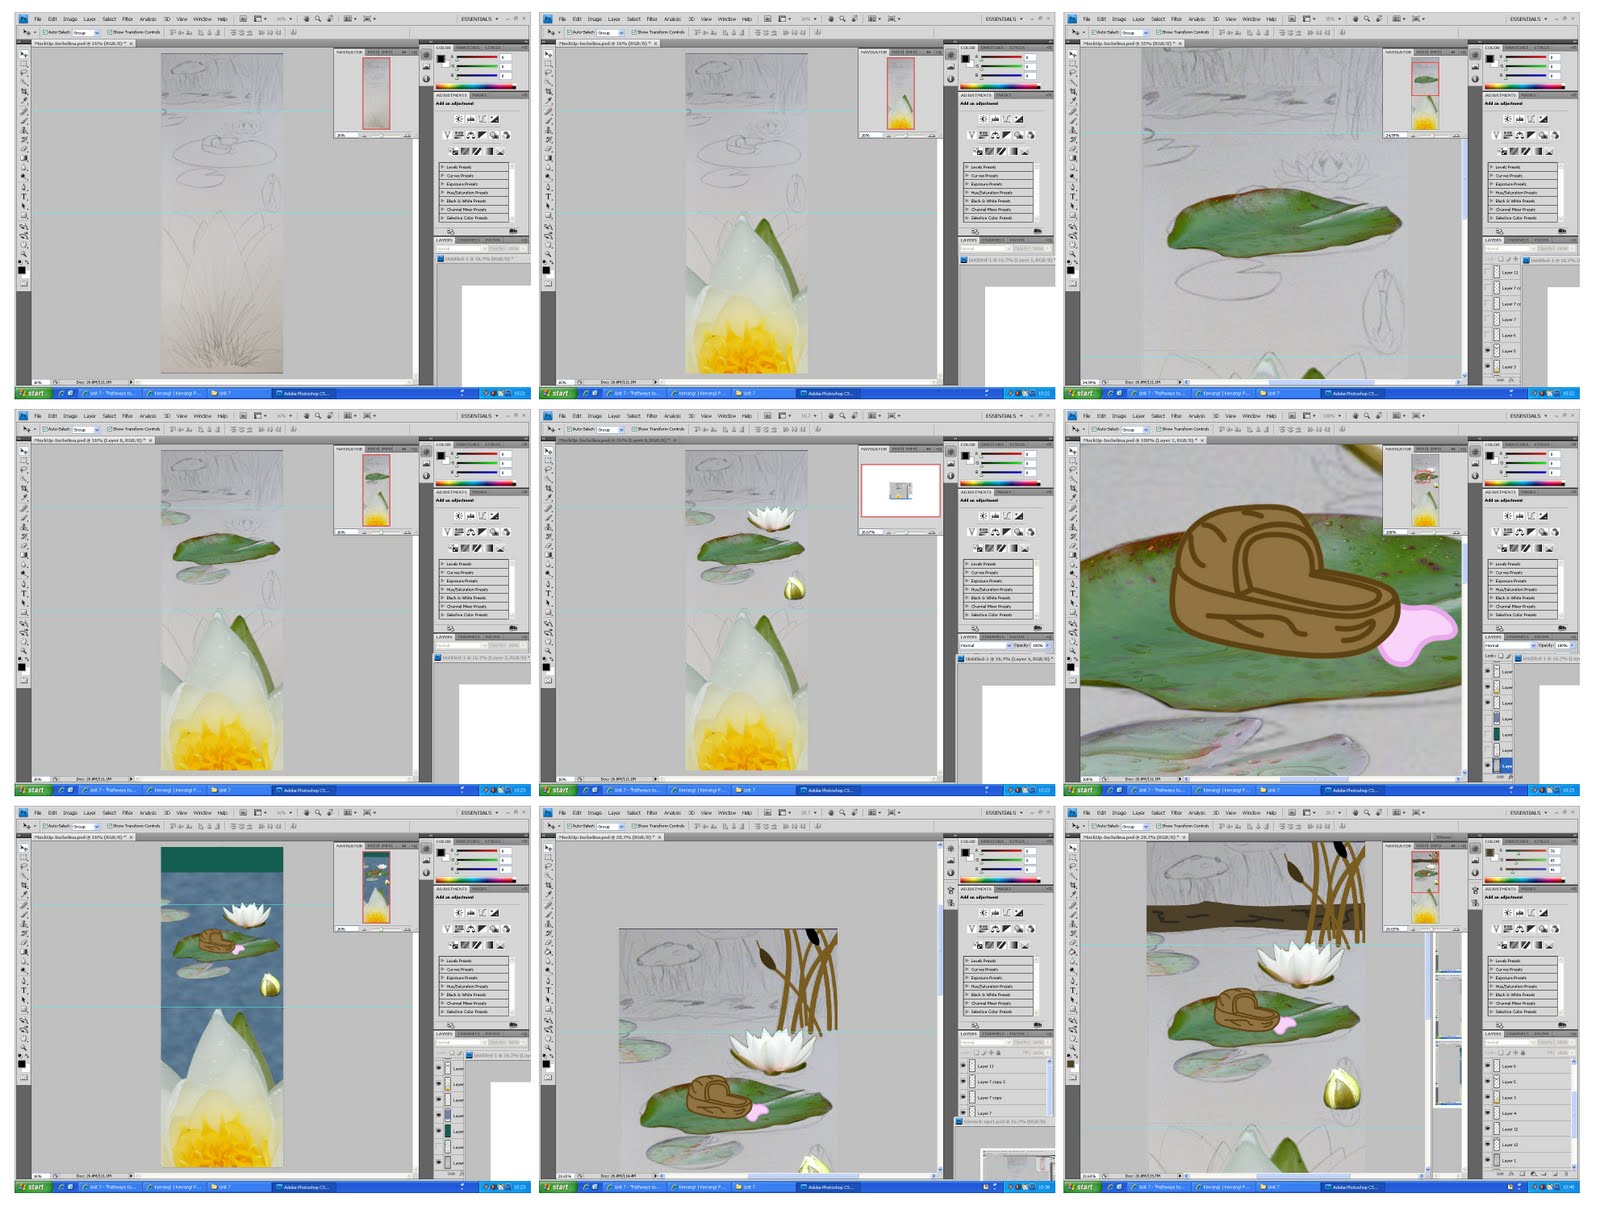
I have begun work on the mock up of my first image, Inchelina.
After applying my design drawing as the bottom layer, I was able to start piecing together my image using a combination of photographs and rough digital painting. The first area I wanted to work on was the flower in the foreground. I want to create the impression that the audience has a viewpoint from inside the flower; however, the images I have of water lilies were taken from above, as I couldn't get into the water to get closer to the flowers. Therefore, it might be difficult to find an image with the right angle to create this impression. I will experiment with this a little later on. I then selected some lily pads and flowers and drew in reeds, the walnut shell bed and a water effect background.
Using my design as a base, I drew in the layer of mud/earth, toadstools and some grass. The grass was made by creating a small section with different blades in a variety of shades and duplicating it at different scales and flipping it occasionally. I have suggested the depth I want to create in the grass by reducing the saturation of the grass sections in the background. I am quite pleased with my image at this stage; I realise it could take quite a lot of time and concentration to build up the level of realism I am hoping to create.
At this stage, I added some shadows to the objects on the stream. These look at little strange for now, but in the final image I will create some reflections and more realistic shadows. I will also create a better sense of movement in the water.
Now that the image is mostly complete, I felt I should return to the first piece I added; the flower. I realise that the photo I initially used doesn't have the right angle, and so I began looking through the rest of my photo stock and found a few other options; above. I think some of these images are much more appropriate for the effect I want to create. The best of these are the middle two, although the centre-right one has a large petal which might be better shortened.

Now that this image is complete, I feel confident in my photo editing skills to successfully complete the task I have set myself. I look forward to creating my other images in this way. Although these images are quite rough, they help me to realise which areas will need more work or more research in order to be completed to the standard I require.

Wednesday, 11 May 2011

New Designs

I have spent today working on widening my design ideas for my Inchelina image. This has involved sketching a variety of designs and alterations on many sheets of A1, adding and removing new and old ideas. it has been very useful and I am pleased to say that at the end of today, I have a design idea for Inchelina that I will now use as a base for my digital mock-up. See large sheets or sketchbook.

During my drawing exercise, I began to think about the height of each element. It will be very important to get the positioning correct for my images to be successful, because the idea very much relies on perspective. I made some notes to this effect in my sketchbook. See sketchbook.

The next set of designs I am going to do is for Rapunzel. I have already been redesigning the tower. See sketchbook.

New Designs Two - Thu 12th May
I have now completed my task of redesigning all three of my images. I am pleased with the progression I have made, and now have final designs that I am ready to build on top of. I will use them as a map for my initial digital mock-ups. This will involve using images I have and combining them with rough digital sketches in Photoshop. This task will help to get an idea of how best to build up my images and which areas will need more work than others. It will also help to give me a better idea of time scales in these last few weeks of the project.

See large sheets or sketchbook for designs.

Tuesday, 10 May 2011

Lenticular Lens Two - May 20th

Unfortunately, I have only just been able to try out this technique as I have been waiting to get hold of a lenticular lens to strip and use for my own purposes. I have finally got one that measures 7.06x4.6cm. I was able to strip it using turps, which put a whole in the printed film; I could then use my fingers to expand the whole and peel off the rest of image.


I then began work in Photoshop. I used a magnifying glass to count how many grooves were in a millimetre of the plastic lens; I then transferred this information into Photoshop, creating a thick field of guides to help me map out the images.
Once the guides were complete, I created two simple images, one large sphere and one small sphere. My plan was to then use the guides to create alternate strips of the different images. When printed out and lined up with the grooves, this would then create a motion effect where the small sphere grows and the large sphere shrinks.

However, as things are never as simple as you expect, the end product didn't work. There are so many points that could have gone wrong; I am unsure exactly where the problem occurred. I think the most likely cause was that the strips and the grooves didn't match up; unfortunately, this isn't a problem that can be easily solved, as each strip is so small that Photoshop simply can't calculate it.

I have tried several attempts at making the process work, both the motion effects and the 3D effects, but none have succeeded. Although the attempts have failed and I am disappointed, I am glad I have tried it. Now I can move on and continue with the development of my ideas.

See sketchbook for printed images.

Lenticular Lens

I have been looking at my DVD collection and have come across two examples with special slip covers. These have what is known as a Lenticular lens, which creates a variety of effects on images, including transformations, animations and 3D effects known as Stereoscopic effects; and I began wondering if I could create such a 3D effect in my illustrations. I have carried out some research into the techniques of printing, image preparation ( http://en.wikipedia.org/wiki/Lenticular_printing ) and have realised it would be impractical for me to create such an effect on the large scale I am hoping to. However, it is still an interesting process to research and I am interested in creating a miniature example.


Lenticular lenses are often used on novelty products, such as bookmarks, and so if I can get hold of one of these products I could try to strip it of its original image and apply my own using a printed sheet of paper. Usually the process would call for lithographic printing processes, but I don't have the time to experiment to this extent. I could produce a Transformation or Animation effect quite easily. It would require a short series of images, which would then be sliced into equal strips and layered alternately. I would have to be sure to measure the strips correctly and accurately, as this could very easily ruin the final outcome.


I realise that the success of this process is a long-shot, but I am willing to put aside a couple of days to experimenting with the outcome.
Lenticular Lens - Example

Sunday, 8 May 2011

New Time Plan

As I my project has not been following my initial plan, due to various changes and an predicted amount of research to carry out, I have decided it will be most effective if I redesign my action plan.
I will now be able to follow this plan much better, as it is more honed into what tasks are left for me to complete and a more realistic amount of workload.

Friday, 6 May 2011

Secondary Research

The rest if my research topics are hard for me to come by in person, and so I have decided to use secondary sources the gain images of these topics; I will then use these as a basis for my designs.

Inchelina
Below are the last pieces of research for my Inchelina illustration.
Toadstools
I have gathered a range of images for my toadstool, as the real ones are quite different from the ones we see in our minds. I will consider which design will be most appropriate for my illustration. I am keen on realism in my images, but I also have to consider my audience.
Walnut shell
At this time of year I have struggled to find walnuts still in the shell, and so have found some online. These will help me create accurate textures and shapes when designing the bed for Inchelina. During my search, I found the right-most image, and thought it was an interesting design that could be adapted into my illustration.
Water Reeds
The water reeds will help to set the scene; they will line the water's edge especially in the background, this will help the scene look thicker and denser.

The Little Mermaid
Fish Shoal
I hope to add a small shoal of fish into the background of my scene, as it will add some depth and detail. I am considering designing it into a shape that resembles something key in the story, i.e. mermaid shaped.
Seaweed and Sea Bed
I am interested in the look of the sea bed and collumns of seaweed. I think this will also add depth to my illustration, as I can use it as a foreground piece and to line the pathway to the castle.
Underwater Ripples
Although I have created a brief underwater scene before in my previous project, it is important that I make this one look realistic; and so I thought it useful to carry out some research. Since I don't have access to an underwater camera or a topical sea, I decided to use secondary sources to widen my knowledge.

I am now going to use all the research I have gathered to create another set of designs. I will then use my matte painting skills to create a digital mock-up of my idea, which I will develop into my final image. My final images will contain a mix of photomontage and digital painting; I will decide which elements will be painted after my designs are complete and I have created my mock-ups.

Wednesday, 4 May 2011

Rose Petal, Leaves and Bushes

There are a variety of natural objects and landscapes that I need to research to help build up some realistic images.
Pink Rose Petal
The rose petal is for Inchelina's bed sheet in the walnut shell. Unfortunately, this rose petal is slightly curled due to age; however, I have gained some knowledge of colour variations and shape. This will help me to create a realistic digital analogue.
Leaves and Grass
The leaves and grass will come in useful for both the Inchelina and Rapunzel illustrations. These leaves are all grown wild on the edge of fields, which will be in keeping with the context of the stories' locations.
Trees and Bushes
Once again, these trees and bushes will be useful for two, if not all three, of my illustrations. I intend to use the conifers as the trees around the castle in the Little Mermaid; and the more wild trees will be useful for the surrounding forest in Rapunzel.
More Trees and Bushes